Sweet potato toast became all the rage a couple of years ago as a gluten-free option for quick breakfasts, lunches, snacks, and party appetizers.
Basically, what can you pile on top of a cracker or piece of toasted bread? You can do the same thing with sweet potato toast. It opens up a whole new world!
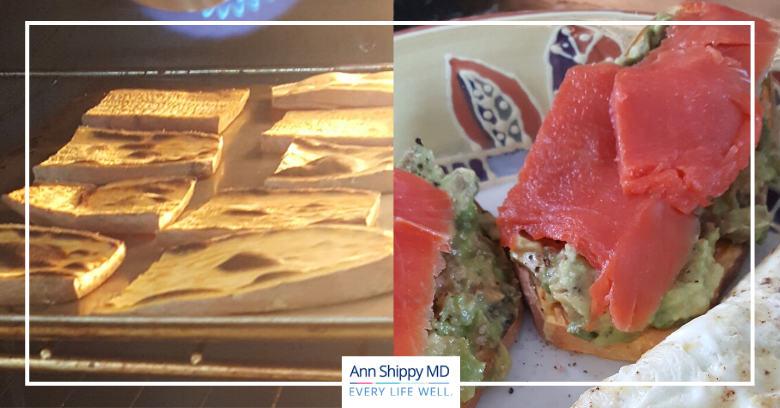
Pictured here is a fabulous breakfast of pasture-raised eggs served with guacamole and smoked salmon on sweet potato toast. More ideas below.
The usual instruction is that you slice raw sweet potatoes lengthwise, then you put the slices literally in your toaster and run through a few rounds until they are browned and done.
Simple enough, but if you’re in a hurry (who isn’t?), it takes some hefty/clumsy knife-work and also some guesswork to know how many rounds you should put your slices through in your toaster before they are actually cooked enough to eat and not burnt.
Here’s my workaround: Do them in a large batch under your broiler and freeze them. The steps for success:
- Check your toaster to see how large you can make the slices with your particular sweet potato. Often you will have best results cutting the larger potatoes in half first before cutting the slices. (NOTE: I advise my patients to be meticulous about avoiding gluten, and if your toaster has already been used for gluten-containing breads, I highly recommend that you buy a new toaster to have as your only gluten-free toaster in the kitchen. This convection toaster oven here is also a great purchase to help with cutting down on the use of a microwave.)
- Preheat your broiler and move the oven rack to the highest position, closest to the heat.
- Slice your sweet potatoes (do as many as you want). If you didn’t cut your sweet potato in half, at least cut the rounded end off one side to give you a stable surface to slice on. If you have a mandolin, even better– set for thick slices and go (always use the safety pusher!). Slice about 1/4″ thick.
- Place slices on a baking sheet and broil for 4-5 minutes in your pre-heated broiler.
- Take them out, flip the slices over, and broil again for another 2 minutes.
- Cool and put in containers to freeze. You may wish to freeze them first flat on the tray, then remove to put in another container later to avoid them freezing stuck together.
- When you want to eat them, take out as many slices as you need, pop them in your toaster for one long cycle, and that is usually enough to thaw and warm them for use.
Faster than fast food drive-through windows, and you’ve kept your healthy habits intact!
Here are some more Paleo ideas for toppings:
- Cashew, sunflower seed, or almond butter with or without fruit (bananas, berries)- sprinkle with cinnamon if you like
- Guacamole alone, or add some chicken or beef
- Roasted tomatoes and dairy-free pesto
- Bacon and eggs your way, maybe do some kind of “Eggs Benedict” version with well-sourced ham
- Dairy-free “cream cheese” like Miyoko’s or Kite Hill with salmon, capers, and red onion
- Any other kind of dairy-free cheese with roasted tomatoes or fresh tomato slices
- Coconut cream and berries…
You see how the possibilities are endless. Share your favorite toppings in the comments!